

Remove the following pentalobe screws securing the lower case to the MacBook Pro:
- Eight 3.1 mm
- Two 2.3 mm
Step 2

Lifting from the edge nearest the clutch cover, lift the lower case off the MacBook Pro.
Step 3

The lower case has two plastic pegs (red) that fit into plastic clips in the upper case (orange).
During reassembly, gently push down the center of the lower case to reattach the case to its two plastic clips.
Step 4 Battery Connector

Peel back the sticker covering the battery connector.
Step 5

Gently lift each side of the battery connector to pry the connector out of its socket on the logic board.
Bend the connector back toward the battery, ensuring that the battery connector doesn't accidentally make contact with the logic board.
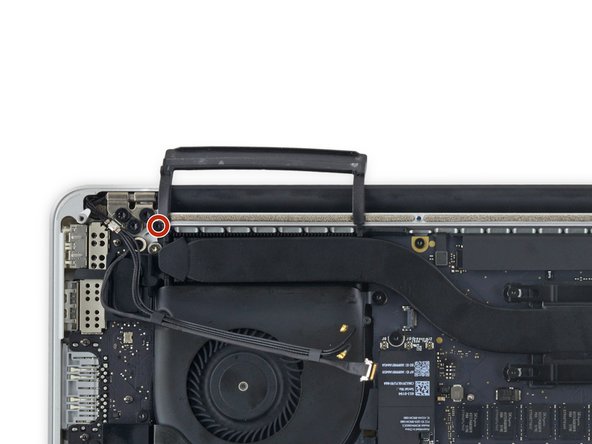
Step 6 AirPort/Camera Cables

Disconnect the three AirPort antenna cable connectors from their sockets on the AirPort board and bend them up and out of the way.
Be careful to pry against the connector, and not the cable or socket.
Step 7

Peel the right rubber cover up off the fan and fold it out of the way.
Step 8

Use the tip of a spudger to push the camera cable connector out of its socket on the logic board.
Be sure to push parallel to the board, pushing first on one side, then the other to "walk" the connector out of its socket.
Step 9

Step 10 Display Assembly

Step 11

Step 12

Step 13
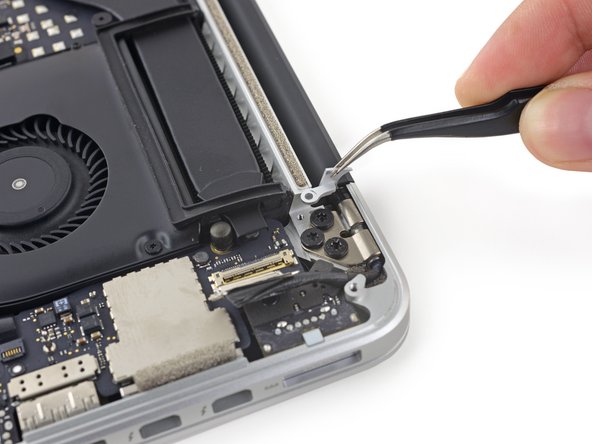
Use your fingers to pull the AirPort/Camera cables up off the fan.
The cables are adhered to the fan, so peel them up carefully to avoid damaging them.
Carefully de-route the cables from the plastic cable guide.
On reassembly, there should be enough adhesive still on these cables to stick them back down to the fan.
Step 10 Display Assembly
Use the tip of a spudger to flip up the display data cable lock and rotate it toward the MagSafe 2 power port side of the computer.
Pull the display data cable straight out of its socket on the logic board.
Do not lift up on the display data cable, as its socket is very fragile. Pull the cable parallel to the face of the logic board.
Do not touch the contacts on the data connector or its socket with your fingers or any tools, as you may deposit oils or damage the pins.
Step 11
Remove the two rubber hinge covers.
Step 12
Remove the two 3.2 mm T5 Torx screws securing the aluminum hinge covers to the upper case.
Step 13

Remove the two aluminum hinge covers from the MacBook Pro.
Step 14


Remove four out of the six 5.3 mm T8 Torx screws securing the display to the upper case.
Leave the innermost screws (one from each hinge) in place.
When reassembling, be sure the two screws going back into the hinge on the left go back through the webcam/AirPort cable bracket.
Step 15

Open the MacBook Pro approximately 110 degrees, and place it sideways on the table, as shown.
Step 16

While holding the display and upper case together with your left hand, remove the remaining T8 Torx screw from the lower (closer to the table) display bracket.
Step 17

Be sure to hold the display and upper case together with your left hand. Failure to do so may cause the freed display/upper case to fall, potentially damaging each component.
While holding the display and upper case together with your left hand, remove the remaining T8 Torx screw from the upper display bracket.
Step 18

Grip both halves of the device, one in each hand.
Gently push forward on the bottom half of the device to detach it from the display assembly.
Carefully set each component aside, making sure to set down the bottom half keyboard-side down to avoid damaging internal components.
Replacement displays may not have their hinges adjusted to the correct angle. Use needle nose pliers to gently adjust them to match the hinges on the display being replaced.
sumber : www.ifixit.com
Semoga tips ini dapat membantu anda.
Jangan lupa share ya.


Anda ada masalah dengan MacBook/Laptop/Iphone?
Slow
Rosak
Serangan Virus
Jangan risau!!
Kami boleh bantu menyelesaikan masalah anda..
Tak tahu dimana lokasi
MACNOTE STUDIO UIA Gombak?
Anda boleh hubungi kami melalui:
· WhatsApp Abang M
· Facebook Macnote studio
· Careline 013 531 6110
Lot 1 As-Souq At-Tullab ,Mahallah Ali Ibn Talib,
International Islamic University Malaysia,
Universiti Islam Antarabangsa,
53100 Jalan Gombak,
Wilayah Persekutuan Kuala Lumpur
Google Maps : Macnote Mobile
E-mail : macbookstation@gmail.com
Waktu Operasi : Isnin - Ahad (10 a.m. - 9 p.m.) Setiap Hari

Anda boleh datang terus ke MACNOTE di UIA Gombak:
1. KAMI DI GOMBAK ( DALAM UIA GOMBAK)
- 15 MINIT DARI KEPONG DAN SELAYANG
- 25 MINIT DARI BANGSAR DAN AMPANG
- 30 MINIT DARI SETAPAK DAN SENTUL
-40 MINIT DARI PUCHONG DAMANSARA DAN CHERAS
Tiada ulasan:
Catat Ulasan